 Code
CodeOne Time Connection Setup
- Launch Eclipse and go to the workbench

- Open the Window -> Open Perspective -> Other menu and select Remote System Explorer (RSE)

- Right click in the Remote Systems panel and select New -> Connection

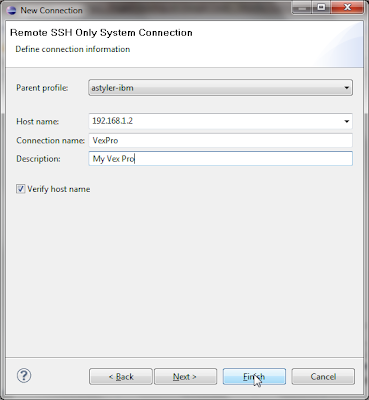
- Choose "SSH Only" and input the IP Address of the VEXPro into the Host name box (e.g. 192.168.1.2). You can view the VEXPro's IP address through its LCD menu by navigating to Wireless Networking -> Wireless Status -> Info.

- Change the Connection Name to VEXPro or something similar
- Test the connection to the VEXPro. Begin by right clicking the connection in the Remote Systems window, and then selecting Connect in the pop-up menu.

- Input the user credentials (default user ID and password are root and qwerk) and have it save both the user ID and password. Click OK and then, in the Remote Systems page, verify that you can explore the files.

- Switch back the the C/C++ development perspective (either by clicking the C/C++ icon in the tab at the top-right corner of the window, or by selecting Window -> Open Perspective -> Other... and then choosing C/C++)

- If the IP or hostname of your VEXPro changes, you will have to return and edit the connection in RSE
previous | up | next