Build the UI
At this point, you've created the components of the StockWatcher project and reviewed its functional requirements and UI design. In this section, you'll build the user interface out of GWT widgets and panels.
- Select the GWT widgets needed to implement the UI elements.
- Select the GWT panels needed to lay out the UI elements.
- Embed the application in the host page, StockWatcher.html.
- Implement the widgets and panels in StockWatcher.java.
- Test the layout in development mode.
GWT shields you from worrying too much about cross-browser incompatibilities. If you construct the interface with GWT widgets and composites, your application will work on the most recent versions of Chrome, Firefox, Internet Explorer, Opera, and Safari. However, DHTML user interfaces remain remarkably quirky; therefore, you still must test your applications thoroughly on every browser.
Selecting GWT widgets to implement the UI elements
First, look at the Widget Gallery and select the GWT widget for each UI element.
In the Widget Gallery the widgets have a default style and so they don't look exactly as they will in the final implementation of StockWatcher. Don't worry about that now. First you'll focus on getting the widgets working. Later, you will change their appearance with CSS in the Applying Styles section.
Stock Data Table
GWT provides a special table widget called a FlexTable. The FlexTable widget creates cells on demand. This is just what you need for the table containing the stock data because you don't know how many stocks the user will add. A table implemented with the FlexTable widget will expand or collapse as the user adds or removes stocks.
Buttons
Whenever possible, GWT defers to a browser's native user interface elements. For instance, a
Button widget becomes a true HTML <button> rather than a synthetic button-like widget that's
built, for example, from a <div>. This means that GWT buttons render as designed by the browser
and client operating system. The benefit of using native browser controls is that they are fast, accessible, and most familiar to users. Also, they can be styled with CSS.
Input Box
GWT provides several widgets to create fields that users can type in:
- TextBox widget, a single-line text box
- PassWordTextBox widget, a text box that visually masks input
- TextArea widget, a multi-line text box
- SuggestBox, a text box that displays a pre-configured set of items
StockWatcher users will type in a stock code which is a single line of text; therefore, implement a TextBox widget.
Label
In contrast with the Button widget, the Label widget does not map to
the HTML <label> element, used in HTML forms. Instead it maps to
a <div> element that contains arbitrary text that is not interpreted as HTML. As a <div>
element, it is a block-level element rather than an inline element.
<div class="gwt-Label">Last update : Oct 1, 2008 1:31:48 PM</div>
If you're interested in taking a peek at the API reference for the GWT widgets you'll use to build the StockWatcher interface, click on the links in the table below.
| UI element | GWT implementation |
|---|---|
| a table to hold the stock data | FlexTable widget |
| two buttons, one to add stocks and one to remove them | Button widget |
| an input box to enter the stock code | TextBox widget |
| a timestamp to show the time and date of the last refresh | Label widget |
| a logo | image file referenced from HTML host page |
| a header | static HTML in HTML host page |
| colors to indicate whether the change in price was positive or negative | dynamic CSS |
In Depth: If you don't find a widget that meets the functional requirements of your application, you can create your own. For details on creating composite widgets or widgets from scratch using Java or JavaScript, see the Developer's Guide, Creating Custom Widgets.
Selecting GWT panels to lay out the UI elements
Now that you know what widgets you'll use, you'll decide how to lay them out using GWT panels. GWT provides several types of panels to manage the layout. Panels can be nested within other panels. This is analogous to laying out your web page in HTML using nested div elements or tables. For StockWatcher, you'll use a horizontal panel nested within a vertical panel.
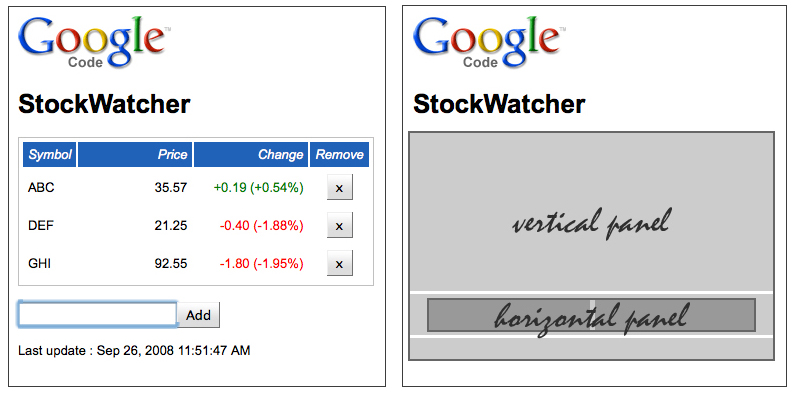
Horizontal Panel
The two elements used to add a stock—the input box for typing in a new stock symbol and the Add button—are closely related functionally and you want keep them together visually. To lay them out side-by-side, you'll put the TextBox widget and a Button widget in a horizontal panel. In the Java code, you'll create a new instance of HorizontalPanel and name it addPanel.
Vertical Panel
You want to lay out the remaining elements vertically:
- the FlexTable widget for the stock table
- the Add Stock panel, which contains the input box and Add button
- the Label widget for the timestamp
You'll do this with a vertical panel. In the Java code, you'll create a new instance of VerticalPanel and name it mainPanel.
Root Panel
There is one more panel you need that is not visible in the user interface: a Root panel. A Root panel is the container for the dynamic elements of your application. It is at the top of any GWT user interface hierarchy. There are two ways you can use a Root panel, either to generate the entire body of the page or to generate specific elements embedded in the body.
The Root panel works by wrapping the <body> or other element in the HTML host page. By default
(that is, if you don't add any placeholders in the host page) the Root panel
wraps the <body> element. However, you can wrap any element if you give it an id and
then, when you call the Root panel, pass the id as a parameter. You'll see how this works in the next two sections when you do it for StockWatcher.
RootPanel.get()             // Default. Wraps the HTML body element.
RootPanel.get("stockList")  // Wraps any HTML element with an id of "stockList"
A host page can contain multiple Root panels. For example, if you're embedding multiple GWT widgets or panels into a host page, each one can be implemented independently of the others, wrapped in its own Root panel.
Embedding the application in the host page
To get the StockWatcher application to run in the browser, you need to embed it in an HTML file, the HTML host page. The host page for the StockWatcher project, StockWatcher.html, was generated by webAppCreator. For the starter application, StockWatcher.html had an empty body element. As a result, the Root panel wrapped the entire body element. The text input box, label ("Please enter your name:") and "Send" button were build dynamically with GWT. If your application has no static elements, you wouldn't need to edit the HTML host page at all.
However, for StockWatcher you will use some static HTML text (for the header) and an image (for the logo) in addition to the dynamic elements. You will embed the GWT application in the browser page using a placeholder, a <div> element with an id of "stockList". This implementation strategy is especially useful for embedding GWT into an existing application.
As shown in the following code, do the following:
- Open the host page, StockWatcher/war/StockWatcher.html.
- In the head element, change the title text to StockWatcher.
- In the body element, add an
<h1>heading, StockWatcher. - In the body element, add a
<div>element and give it an id of stockList. - Delete the unneeded elements from the starter project application.
- Save the file StockWatcher.html.
<!DOCTYPE html>
<html>
  <head>
    <meta http-equiv="content-type" content="text/html; charset=UTF-8">
    <link type="text/css" rel="stylesheet" href="StockWatcher.css">
    <title>StockWatcher</title>
    <script type="text/javascript" language="javascript" src="stockwatcher/stockwatcher.nocache.js"></script>
  </head>
  <body>
    <h1>StockWatcher</h1>
    <div id="stockList"></div>
    <iframe src="javascript:''" id="__gwt_historyFrame" tabIndex='-1' style="position:absolute;width:0;height:0;border:0"></iframe>
    <noscript>
      <div style="width: 22em; position: absolute; left: 50%; margin-left: -11em; color: red; background-color: white; border: 1px solid red; padding: 4px; font-family: sans-serif">
        Your web browser must have JavaScript enabled
        in order for this application to display correctly.
      </div>
    </noscript>
  </body>
</html>
Note: HTML comments have been omitted for brevity.
Implementing widgets and panels
Next you will construct the user interface from GWT widgets and panels.
You want the UI to display as soon as StockWatcher starts up, so you'll implement them in the onModuleLoad method. In this section, you will:
- Instantiate each widget and panel.
- Create the table that holds the stock data.
- Lay out the widgets using the Add Stock (horizontal) panel and the Main (vertical) panel.
- Associate the Main panel with the Root panel.
- Move the cursor focus to the input box.
You can follow this section of the tutorial step-by-step, or you can cut and paste the entire block of code from the Summary at the end.
Instantiate each widget and panel
-
Instantiate each widget and panel using class field initializers.
-
Open StockWatcher/src/com/google/gwt/sample/stockwatcher/client/StockWatcher.java.
-
In StockWatcher.java, replace all the existing code for the starter application (from the imports down to the handler) with the following code.
package com.google.gwt.sample.stockwatcher.client; public class StockWatcher implements EntryPoint { private VerticalPanel mainPanel = new VerticalPanel(); private FlexTable stocksFlexTable = new FlexTable(); private HorizontalPanel addPanel = new HorizontalPanel(); private TextBox newSymbolTextBox = new TextBox(); private Button addStockButton = new Button("Add"); private Label lastUpdatedLabel = new Label(); /** * Entry point method. */ public void onModuleLoad() { // TODO Create table for stock data. // TODO Assemble Add Stock panel. // TODO Assemble Main panel. // TODO Associate the Main panel with the HTML host page. // TODO Move cursor focus to the input box. } } -
Along the left edge, Eclipse flags the variable definitions with a red "x" because their types are undefined.
Tip: One way you can leverage Eclipse is to use its "suggest" feature to add the required import declarations, as follows.
-
-
Display suggested corrections by clicking on the first red "x".
- Select
import EntryPoint (com.google.gwt.core.client.EntryPoint)"by pressing return.
- Select
-
Resolve all the other errors by declaring the import declarations in the same way. If you are not using Eclipse, cut and paste from the highlighted code below.
package com.google.gwt.sample.stockwatcher.client;

import com.google.gwt.core.client.EntryPoint;
import com.google.gwt.user.client.ui.Button;
import com.google.gwt.user.client.ui.FlexTable;
import com.google.gwt.user.client.ui.HorizontalPanel;
import com.google.gwt.user.client.ui.Label;
import com.google.gwt.user.client.ui.TextBox;
import com.google.gwt.user.client.ui.VerticalPanel;

public class StockWatcher implements EntryPoint {

  private VerticalPanel mainPanel = new VerticalPanel();
  private FlexTable stocksFlexTable = new FlexTable();
  private HorizontalPanel addPanel = new HorizontalPanel();
  private TextBox newSymbolTextBox = new TextBox();
  private Button addStockButton = new Button("Add");
  private Label lastUpdatedLabel = new Label();

  /**
   * Entry point method.
   */
  public void onModuleLoad() {
    // TODO Create table for stock data.
    // TODO Assemble Add Stock panel.
    // TODO Assemble Main panel.
    // TODO Associate the Main panel with the HTML host page.
    // TODO Move cursor focus to the input box.
  }
}
Create a table for stock data
Implement the table that will hold the stock data. Set up the header row of the table. To do this, use the setText method to create labels in the heading of each column: Symbol, Price, Change, Remove.
-
Create a table for stock data.
In the onModuleLoad method, replace the TODO comment with the highlighted code.
package com.google.gwt.sample.stockwatcher.client;

import com.google.gwt.core.client.EntryPoint;
import com.google.gwt.user.client.ui.Button;
import com.google.gwt.user.client.ui.FlexTable;
import com.google.gwt.user.client.ui.HorizontalPanel;
import com.google.gwt.user.client.ui.Label;
import com.google.gwt.user.client.ui.TextBox;
import com.google.gwt.user.client.ui.VerticalPanel;

public class StockWatcher implements EntryPoint {

  private VerticalPanel mainPanel = new VerticalPanel();
  private FlexTable stocksFlexTable = new FlexTable();
  private HorizontalPanel addPanel = new HorizontalPanel();
  private TextBox newSymbolTextBox = new TextBox();
  private Button addStockButton = new Button("Add");
  private Label lastUpdatedLabel = new Label();

  /**
   * Entry point method.
   */
  public void onModuleLoad() {
    // Create table for stock data.
    stocksFlexTable.setText(0, 0, "Symbol");
    stocksFlexTable.setText(0, 1, "Price");
    stocksFlexTable.setText(0, 2, "Change");
    stocksFlexTable.setText(0, 3, "Remove");

    // TODO Assemble Add Stock panel.
    // TODO Assemble Main panel.
    // TODO Associate the Main panel with the HTML host page.
    // TODO Move cursor focus to the input box.

  }

}
You can see that adding to a table can be accomplished with a call to the setText method. The first parameter indicates the row, the second the column, and the final parameter is the text that will be displayed in the table cell.
Lay out the widgets
To lay out the widgets, you'll assemble two panels, the Add Stock panel and the Main panel. First assemble the Add Stock panel, a horizontal panel that wraps the input box and Add button. Then assemble the Main panel, a vertical panel that specifies the layout of the stock list table, the Add Stock panel, and the timestamp.
-
Lay out the widgets in the Add Stock panel and the Main panel.
In the onModuleLoad method, replace the TODO comment with the highlighted code.
package com.google.gwt.sample.stockwatcher.client;

import com.google.gwt.core.client.EntryPoint;
import com.google.gwt.user.client.ui.Button;
import com.google.gwt.user.client.ui.FlexTable;
import com.google.gwt.user.client.ui.HorizontalPanel;
import com.google.gwt.user.client.ui.Label;
import com.google.gwt.user.client.ui.TextBox;
import com.google.gwt.user.client.ui.VerticalPanel;

public class StockWatcher implements EntryPoint {

  private VerticalPanel mainPanel = new VerticalPanel();
  private FlexTable stocksFlexTable = new FlexTable();
  private HorizontalPanel addPanel = new HorizontalPanel();
  private TextBox newSymbolTextBox = new TextBox();
  private Button addStockButton = new Button("Add");
  private Label lastUpdatedLabel = new Label();

  /**
   * Entry point method.
   */
  public void onModuleLoad() {
    // Create table for stock data.
    stocksFlexTable.setText(0, 0, "Symbol");
    stocksFlexTable.setText(0, 1, "Price");
    stocksFlexTable.setText(0, 2, "Change");
    stocksFlexTable.setText(0, 3, "Remove");

    // Assemble Add Stock panel.
    addPanel.add(newSymbolTextBox);
    addPanel.add(addStockButton);

    // Assemble Main panel.
    mainPanel.add(stocksFlexTable);
    mainPanel.add(addPanel);
    mainPanel.add(lastUpdatedLabel);

    // TODO Associate the Main panel with the HTML host page.
    // TODO Move cursor focus to the input box.

  }

}
Associate the Main panel with the Root panel
In order for any GWT widget or panel to be embedded in the HTML host page, it must be contained within a Root panel. Associate the Root panel with Vertical panel assigned to mainPanel. The Root panel wraps the HTML element (in StockWatcher's host page) that has an id of "stocklist". In this case, it is a <div> element.
-
Associate the Main panel with the host page via the Root panel.
-
In the onModuleLoad method, replace the TODO comment with the highlighted code.
package com.google.gwt.sample.stockwatcher.client; import com.google.gwt.core.client.EntryPoint; import com.google.gwt.user.client.ui.Button; import com.google.gwt.user.client.ui.FlexTable; import com.google.gwt.user.client.ui.HorizontalPanel; import com.google.gwt.user.client.ui.Label; import com.google.gwt.user.client.ui.TextBox; import com.google.gwt.user.client.ui.VerticalPanel; public class StockWatcher implements EntryPoint { private VerticalPanel mainPanel = new VerticalPanel(); private FlexTable stocksFlexTable = new FlexTable(); private HorizontalPanel addPanel = new HorizontalPanel(); private TextBox newSymbolTextBox = new TextBox(); private Button addStockButton = new Button("Add"); private Label lastUpdatedLabel = new Label(); /** * Entry point method. */ public void onModuleLoad() { // Create table for stock data. stocksFlexTable.setText(0, 0, "Symbol"); stocksFlexTable.setText(0, 1, "Price"); stocksFlexTable.setText(0, 2, "Change"); stocksFlexTable.setText(0, 3, "Remove"); // Assemble Add Stock panel. addPanel.add(newSymbolTextBox); addPanel.add(addStockButton); // Assemble Main panel. mainPanel.add(stocksFlexTable); mainPanel.add(addPanel); mainPanel.add(lastUpdatedLabel); // Associate the Main panel with the HTML host page. RootPanel.get("stockList").add(mainPanel); // TODO Move cursor focus to the input box. } } -
Eclipse flags RootPanel and suggests the correct import declaration.
-
-
Include the import declaration.
import com.google.gwt.user.client.ui.RootPanel;
Move cursor focus to the input box
Finally, move the cursor focus to the input box so, when StockWatcher loads, the user can begin adding stocks.
In the onModuleLoad method, replace the TODO comment with the highlighted code.
package com.google.gwt.sample.stockwatcher.client;

import com.google.gwt.core.client.EntryPoint;
import com.google.gwt.user.client.ui.Button;
import com.google.gwt.user.client.ui.FlexTable;
import com.google.gwt.user.client.ui.HorizontalPanel;
import com.google.gwt.user.client.ui.Label;
import com.google.gwt.user.client.ui.RootPanel;
import com.google.gwt.user.client.ui.TextBox;
import com.google.gwt.user.client.ui.VerticalPanel;

public class StockWatcher implements EntryPoint {

  private VerticalPanel mainPanel = new VerticalPanel();
  private FlexTable stocksFlexTable = new FlexTable();
  private HorizontalPanel addPanel = new HorizontalPanel();
  private TextBox newSymbolTextBox = new TextBox();
  private Button addStockButton = new Button("Add");
  private Label lastUpdatedLabel = new Label();

  /**
   * Entry point method.
   */
  public void onModuleLoad() {
    // Create table for stock data.
    stocksFlexTable.setText(0, 0, "Symbol");
    stocksFlexTable.setText(0, 1, "Price");
    stocksFlexTable.setText(0, 2, "Change");
    stocksFlexTable.setText(0, 3, "Remove");

    // Assemble Add Stock panel.
    addPanel.add(newSymbolTextBox);
    addPanel.add(addStockButton);

    // Assemble Main panel.
    mainPanel.add(stocksFlexTable);
    mainPanel.add(addPanel);
    mainPanel.add(lastUpdatedLabel);

    // Associate the Main panel with the HTML host page.
    RootPanel.get("stockList").add(mainPanel);

    // Move cursor focus to the input box.
    newSymbolTextBox.setFocus(true);

  }

}
Summary
Here's what you've done to this point.
package com.google.gwt.sample.stockwatcher.client;

import com.google.gwt.core.client.EntryPoint;
import com.google.gwt.user.client.ui.Button;
import com.google.gwt.user.client.ui.FlexTable;
import com.google.gwt.user.client.ui.HorizontalPanel;
import com.google.gwt.user.client.ui.Label;
import com.google.gwt.user.client.ui.RootPanel;
import com.google.gwt.user.client.ui.TextBox;
import com.google.gwt.user.client.ui.VerticalPanel;

public class StockWatcher implements EntryPoint {

  private VerticalPanel mainPanel = new VerticalPanel();
  private FlexTable stocksFlexTable = new FlexTable();
  private HorizontalPanel addPanel = new HorizontalPanel();
  private TextBox newSymbolTextBox = new TextBox();
  private Button addStockButton = new Button("Add");
  private Label lastUpdatedLabel = new Label();

  /**
   * Entry point method.
   */
  public void onModuleLoad() {
    // Create table for stock data.
    stocksFlexTable.setText(0, 0, "Symbol");
    stocksFlexTable.setText(0, 1, "Price");
    stocksFlexTable.setText(0, 2, "Change");
    stocksFlexTable.setText(0, 3, "Remove");

    // Assemble Add Stock panel.
    addPanel.add(newSymbolTextBox);
    addPanel.add(addStockButton);

    // Assemble Main panel.
    mainPanel.add(stocksFlexTable);
    mainPanel.add(addPanel);
    mainPanel.add(lastUpdatedLabel);

    // Associate the Main panel with the HTML host page.
    RootPanel.get("stockList").add(mainPanel);

    // Move cursor focus to the input box.
    newSymbolTextBox.setFocus(true);

  }

}
Testing the layout
One benefit of using GWT in your AJAX application development is that you can see the effects of your code changes as soon as you refresh the browser running development mode. So that you can see your changes whether you are developing or debugging, in Eclipse, run StockWatcher in debug mode. Then you'll be able to switch between Java and Debug perspectives without having to relaunch StockWatcher.
- Save the edited file:
- Save
StockWatcher.java
- Save
- If the StockWatcher project is still running from the startup application, stop it by going to the Development Mode tab an clicking on the red square in its upper right corner, whose tooltip says "Terminate Selected Launch", and then the gray "XX" to its right, whose tooltip says "Remove All Terminated Launches". It may take a minute for it to complete, before you can do the next step.
- Launch StockWatcher in development mode.
- From the Eclipse menu bar, select
Run > Debug As > Web Application - If you are not using Eclipse, from the command line enter
ant devmode
- From the Eclipse menu bar, select
- The browser displays your first iteration of the StockWatcher application. The button will not work until we later implement it.

- StockWatcher displays the header of the flex table, the input box, and the Add button. You haven't yet set the text for the Label, so it isn't displayed. You'll do that after you've implemented the stock refresh mechanism.
- Leave StockWatcher running in development mode.
- In the rest of this tutorial, you'll frequently be testing changes in development mode.
Refreshing Development Mode
You do not always need to relaunch your application in development mode after modifying your source code. Instead, just click the browser's Refresh button after saving your changes, and the code server will automatically recompile your application and open the new version.
Best Practices: You may notice that your changes take effect sometimes even if you do not refresh development mode. This behavior is a result of the way development mode interacts with the compiled code, but it is not always reliable. Specifically, it happens only when you make minor changes to existing functions. To ensure your changes are included, make it a habit to always refresh the browser after making changes.
What's Next
At this point you've built the basic UI components of StockWatcher by implementing GWT widgets and panels. The widgets don't respond to any input yet.
Now you're ready to code event handling on the client. You'll wire up the widgets to listen for events and write the code that responds to those events.